How to Optimize Images for Web and SEO | Best Image SEO Tips
Introduction
Images are essential for engaging web content—but they can also be the silent culprit behind slow page loads and poor search engine rankings. In fact, images often account for over 50% of a webpage’s total weight. That’s why learning how to optimize images for web and SEO is critical if you want to improve page speed, boost rankings, and enhance user experience.
Whether you run a blog, an eCommerce store, or a business website, image optimization ensures your visuals are lightweight, relevant, and search-engine friendly. In this comprehensive guide, we’ll cover practical steps to master image SEO, from compression and alt text to file naming and structured data.
1. What Is Image Optimization?
Image optimization refers to the process of reducing the file size of your images without compromising quality, while enhancing their ability to be found and understood by search engines.
Unoptimized images can:
○ Slow down your site
○ Increase bounce rates
○ Harm your mobile usability score
○ Lower your SEO rankings on Google
For example, if your product page loads in 5 seconds instead of 1.5 seconds due to heavy images, many users will bounce before even viewing your offer. Google takes that seriously and might rank your competitor higher.
Optimizing images improves both performance and discoverability—a win-win for users and search engines.
2. Choose the Right Image File Format
Selecting the correct image format directly affects quality, file size, and compatibility. Here are the most common formats and when to use each:
| Format | Best For | Pros | Cons |
| JPEG | Photographs | High compression, good quality | Lossy format |
| PNG | Graphics, icons, logos | Transparent backgrounds, lossless | Large file size |
| WebP | Web images | Great quality + small size | Not supported on some older browsers |
| SVG | Vector graphics, logos | Scalable, tiny file size | Not for photos |
| AVIF | Cutting-edge format | Excellent compression | Limited browser support (improving) |
Tip: For photos, use WebP or JPEG. For logos or UI graphics, go with SVG or PNG. Use AVIF for performance-focused projects if browser compatibility is acceptable.
3. Resize and Compress Images for the Web
Large images take longer to load and strain bandwidth. That’s why resizing and compressing them is essential.
Resizing: Match image dimensions to the display size. No need to upload a 3000px-wide image for a 600px container.
Compression: Reduces file size while maintaining visual integrity.
Recommended Tools:
Aim for:
○ File sizes under 100 KB for standard visuals
○ Under 500 KB for full-width hero images
Remember: Smaller file size = faster pages = better SEO.
4. Use Descriptive File Names
Search engines can't “see” images—they rely on file names and metadata.
Bad file name: IMG_0023.jpg
Good file name: organic-avocado-toast.jpg
Best Practices:
○ Use hyphens, not underscores
○ Include primary or related keywords
○ Keep it short, relevant, and descriptive
This improves both accessibility and discoverability, especially in Google Images.
5. Add SEO-Friendly Alt Text
Alt text (alternative text) describes the content of an image for screen readers and search engines. It's also a ranking factor for image SEO.
Why Alt Text Matters:
○ Improves accessibility
○ Provides context to Google
○ Shows in place of images if they fail to load
Best Practices:
○ Describe the image clearly: “Woman holding eco-friendly grocery bag”
○ Include keywords naturally
○ Avoid keyword stuffing (e.g., “eco bag eco bag eco bag”)
Wrong: image1.jpg with alt="bag"
Right: eco-grocery-bag.jpg with alt="Reusable grocery bag made from recycled fabric"
6. Implement Lazy Loading
Lazy loading delays the loading of off-screen images until the user scrolls to them. This significantly reduces initial load time.
How to Enable Lazy Loading
In modern HTML:
<img src="image.jpg" alt="..." loading="lazy">
Or use JavaScript libraries like lazysizes.
Benefits:
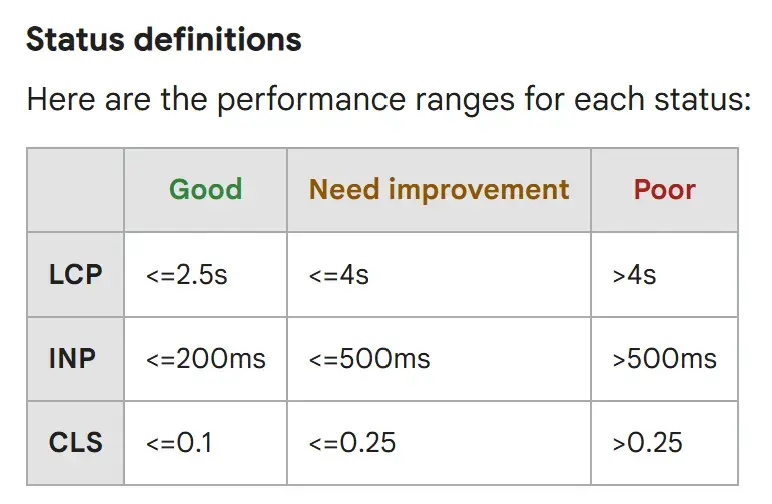
○ Improves Core Web Vitals (especially Largest Contentful Paint)
○ Enhances mobile performance
○ Google supports and recommends it
Important: Don’t lazy-load above-the-fold images; it can hurt perceived load speed.
7. Use Responsive Images
With devices ranging from 320px to 1920px wide, serving one image to all users is inefficient. Instead, use responsive images with srcset and sizes.
<img
  src="image-600.jpg"
  srcset="image-600.jpg 600w, image-1200.jpg 1200w"
  sizes="(max-width: 768px) 100vw, 50vw"
  alt="Fresh salad bowl">
Benefits:
○ Delivers appropriately sized images to different devices
○ Reduces data usage
○ Improves SEO signals (especially mobile-first indexing)
Responsive design isn't just for layout—it’s for images too.
8. Optimize Image Delivery with CDNs
Content Delivery Networks (CDNs) serve images from servers closest to the user, reducing latency.
Benefits of Image CDNs:
○ Faster load times globally
○ Auto-optimization (WebP conversion, resizing)
○ Caching and security features
Popular Image CDN Services:
If your CMS or host doesn’t provide CDN support, consider integrating an external solution. Many CDNs also include optimization as a service.
9. Use Structured Data for Images
Adding structured data helps Google understand and feature your images in rich results, especially for products, recipes, or news.
Use JSON-LD with ImageObject for best results. Example:
{
  "@context": "https://schema.org",
  "@type": "Product",
  "name": "Eco-Friendly Water Bottle",
  "image": "https://example.com/images/water-bottle.jpg",
  "description": "Reusable stainless steel bottle",
  "brand": {
    "@type": "Brand",
    "name": "GreenGoods"
  }
}
This can help your images appear in Google Images with badges, increasing visibility and click-through rates.
10. Keep Images Crawlable and Indexed
Google can’t index what it can’t see.
Ensure:
○ You don’t block
/images/folder inrobots.txt○ Use clean, crawlable image URLs (avoid dynamic parameters)
○ Include images in your XML sitemap or use
<image:image>tags in your existing sitemap
Example:
<image:image>
  <image:loc>https://example.com/images/seo-guide.jpg</image:loc>
  <image:caption>SEO checklist for beginners</image:caption>
</image:image>
Also, place images close to relevant content and avoid hidden or orphaned visuals.
Conclusion: Recap and Next Steps
Optimizing images for the web and SEO is no longer optional—it’s essential. By choosing the right formats, compressing files, writing descriptive alt text, using CDNs, and making your visuals crawlable, you can:
✅ Improve page speed
✅ Enhance user experience
✅ Boost search rankings
✅ Drive more traffic via Google Images
Take a moment to audit your current images using the techniques covered here. Better yet, create a repeatable workflow or checklist for image SEO in all future content.